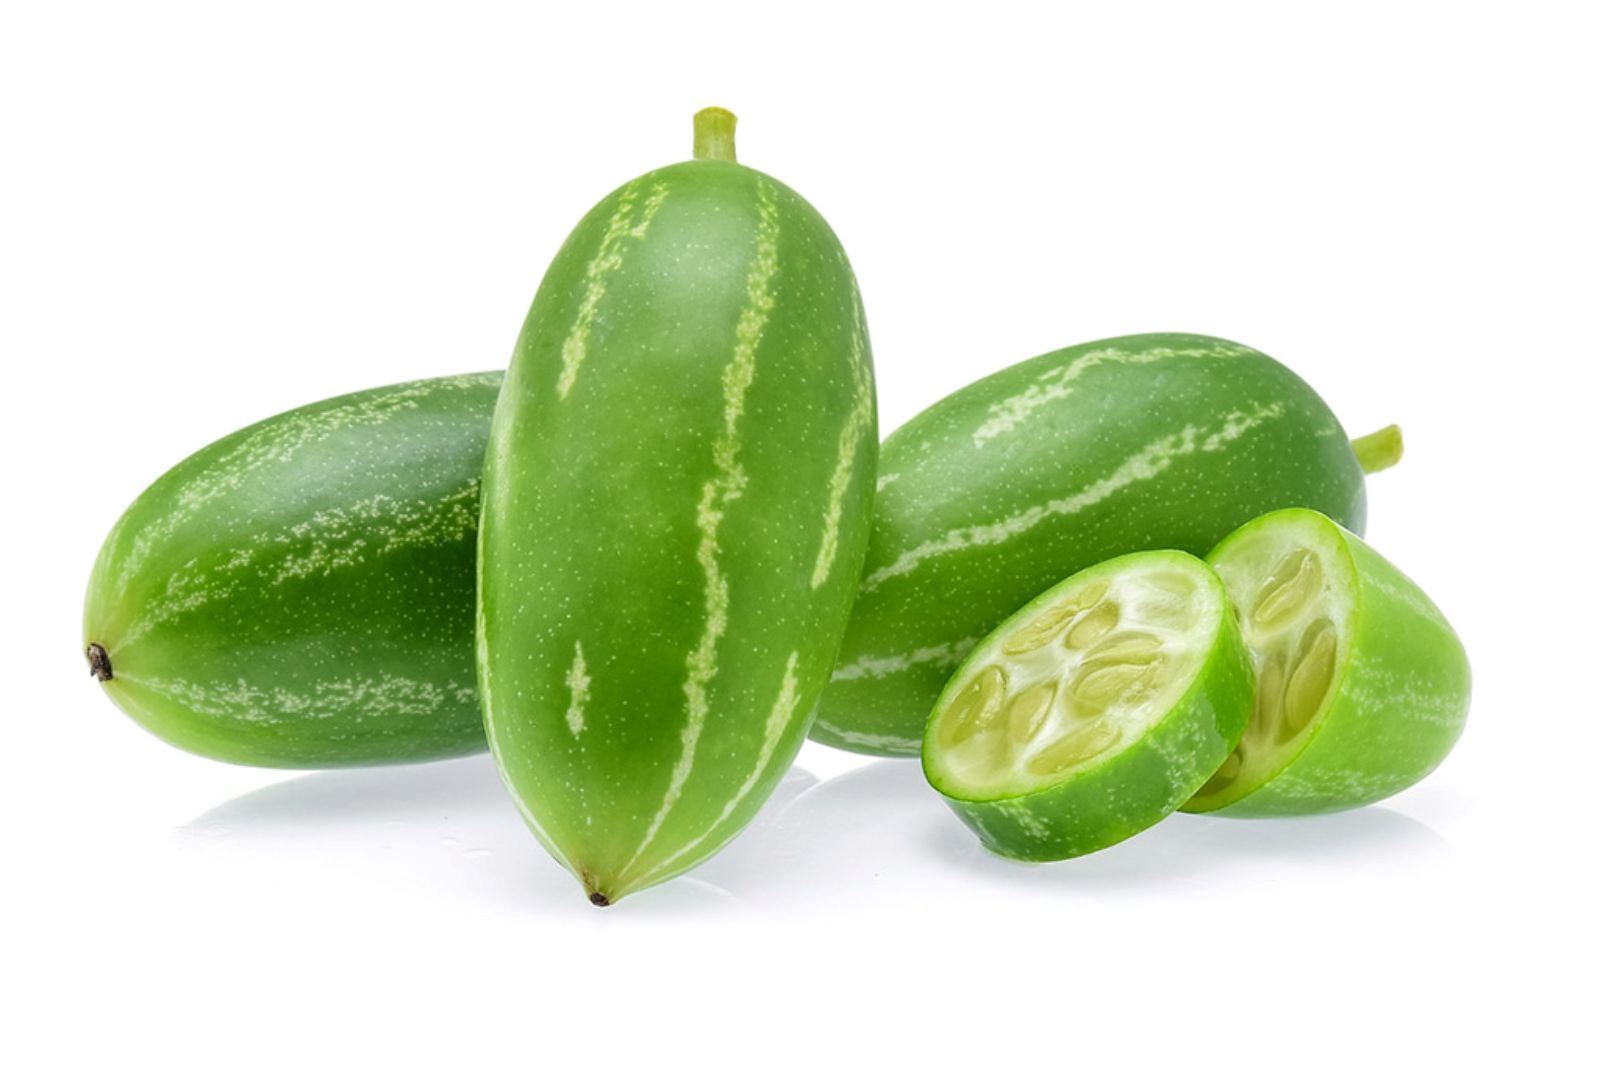
Tindora, also known as Ivy gourd or scarlet gourd, is a small, elongated vegetable that is commonly used in Indian and Southeast Asian cuisines. It has a slightly tangy flavor and a crunchy texture, making it a popular ingredient in various dishes. Freezing tindora allows you to preserve its freshness and enjoy it even when it’s not in season. By following a few simple steps, you can freeze tindora while retaining its desired texture and taste. This article provides a comprehensive guide on freezing tindora to ensure its optimal quality for future use.
Here’s a step-by-step guide on how to freeze tindora:
Step 1: Select fresh tindora
When freezing tindora, it is crucial to begin with fresh and high-quality produce. Selecting tindora that is firm and vibrant in color ensures that you will freeze vegetables at their peak freshness. Fresh tindora will have a crisp texture and a vibrant green color, indicating its optimal quality.
Choosing wilted or discolored tindora can negatively impact the taste, texture, and overall quality of the frozen product. Wilted tindora may have lost its natural moisture and become limp, resulting in a mushy texture after freezing. Discolored tindora could be a sign of spoilage or aging, indicating that it may not freeze well and could affect the flavor of other ingredients or dishes when used later.
By starting with fresh tindora, you set the foundation for a successful freezing process. Fresh tindora will retain its crispness and vibrant color even after freezing, ensuring that you can enjoy the same quality and flavor when using it in future recipes. So, take the time to carefully select firm and vibrant tindora to achieve the best results when freezing this versatile vegetable.
Step 2: Wash and trim the tindora
After selecting fresh tindora, it’s important to wash and trim them before proceeding with the freezing process. This step ensures that any dirt, debris, or contaminants on the surface of the tindora are removed, promoting food safety and maintaining the quality of the frozen product.
To wash the tindora, start by placing them under cold running water. Gently rub each tindora to remove any visible dirt or residue. By rinsing the tindora, you eliminate potential impurities that could affect the taste and texture of the frozen vegetables.
Next, trim off the ends of the tindora. This step is important for two reasons. Firstly, it helps to remove any parts that may have been damaged or spoiled, ensuring that only fresh and healthy tindora are frozen. Secondly, trimming the ends creates uniformity in size, which promotes even freezing and makes it easier to handle the tindora during cooking once they are thawed.
Step 3: Blanch the tindora
Blanching is a crucial step in freezing tindora as it helps preserve its color, texture, and nutrients. Blanching involves briefly boiling the tindora before freezing, and it serves multiple purposes in the preservation process.
Firstly, blanching helps to retain the vibrant green color of the tindora. The boiling water inactivates enzymes present in the vegetable that can cause color changes and loss of vibrancy during freezing. By blanching, you lock in the attractive green color of the tindora, making it visually appealing even after it has been frozen and thawed.
Secondly, blanching helps to preserve the texture of the tindora. The quick boil inactivates enzymes that can break down the vegetable’s cell structure, which can result in a mushy texture after freezing. By blanching the tindora briefly, you maintain its firmness and crispness, ensuring a pleasant texture when you use it in your recipes later on.
Lastly, blanching helps to retain the essential nutrients present in tindora. While freezing can cause some nutrient loss, blanching helps to minimize this loss by quickly heating the tindora and stopping enzyme activity. By blanching the tindora before freezing, you help preserve its nutritional value, allowing you to enjoy its health benefits even after freezing and thawing.
To blanch the tindora, bring a pot of water to a boil. Carefully add the tindora to the boiling water and let them blanch for about 2 minutes. The exact time may vary slightly depending on the size and thickness of the tindora, so it’s important to monitor them closely. After blanching, promptly remove the tindora from the boiling water and transfer them to a bowl of ice water. This rapid cooling process, known as “shocking,” halts the cooking process and helps to maintain the tindora’s texture and color.
Can I freeze tindora without blanching them?
Blanching is recommended to preserve the color, texture, and nutrients of tindora. However, if you prefer to skip this step, you can freeze them directly, although the quality may be slightly affected.
Step 4: Drain and dry the tindora
After blanching the tindora, it is important to drain and thoroughly dry them before proceeding with the freezing process. This step helps to remove excess moisture from the tindora, which can prevent ice crystals from forming and minimize the risk of freezer burn.
Draining the blanched tindora allows any excess water to be removed. Excess moisture can contribute to the formation of ice crystals during freezing, which can negatively impact the texture and quality of the tindora. By draining the tindora, you ensure that only the desired amount of moisture is present, allowing for better freezing results.
After draining, it is crucial to pat the tindora dry using a clean kitchen towel or paper towels. Drying the tindora thoroughly is important because any residual moisture can lead to freezer burn, which can cause the tindora to become dry, discolored, and develop an off-flavor. By ensuring the tindora is completely dry, you minimize the risk of freezer burn and help maintain its quality during storage.
Take care to gently pat the tindora, being thorough but not applying excessive pressure that may crush or damage them. Properly dried tindora will freeze more effectively and maintain their optimal texture and flavor.
Step 5: Arrange the tindora for freezing
Properly arranging the blanched and dried tindora before freezing is essential to prevent them from sticking together. By laying them in a single layer on a baking sheet or tray lined with parchment paper, you create space between the tindora, allowing for efficient freezing and easy handling when it’s time to use them.
When tindora pieces come into contact with each other during freezing, they can freeze together, making it difficult to separate them later on. By ensuring that the tindora are not touching each other, you prevent them from sticking together, allowing you to easily portion out the desired amount without any hassle.
Lining the baking sheet or tray with parchment paper helps prevent the tindora from sticking to the surface and makes it easier to remove them once they are frozen. Parchment paper provides a non-stick surface and helps maintain the integrity of the tindora during the freezing process.
Arranging the tindora in a single layer also allows for more even and efficient freezing. Each piece can freeze individually, ensuring that they maintain their shape and texture. It also enables faster freezing, which helps to preserve the quality of the tindora.
Step 6: Flash-freeze the tindora
Flash-freezing is a technique used to quickly freeze the tindora in order to preserve their individual shape, texture, and prevent them from clumping together. By placing the baking sheet or tray with the tindora in the freezer, you expedite the freezing process, allowing for optimal results.
During flash-freezing, the tindora is exposed to very low temperatures, causing the water content inside the vegetable to freeze rapidly. This rapid freezing helps to minimize the formation of large ice crystals, which can affect the texture and quality of the tindora. Instead, small ice crystals form, preserving the integrity of the vegetable.
Flash-freezing also helps to prevent the tindora from clumping together. When individual pieces freeze quickly, they maintain their separation, making it easier to portion out the desired amount when you want to use them in your recipes. This eliminates the need to thaw an entire clump of tindora when you only need a portion, allowing for convenient usage.
The duration of flash-freezing the tindora is typically about 1 to 2 hours, or until they are firm to the touch. However, freezing times can vary depending on factors such as the size and thickness of the tindora, as well as the temperature of your freezer. It’s important to monitor the tindora closely during this process to ensure they are adequately frozen.
Step 7: Package and seal the tindora
Once the tindora are flash-frozen, it’s important to transfer them into proper packaging to maintain their quality during long-term freezer storage. By using airtight freezer bags or containers and removing as much air as possible, you create a protective barrier that prevents freezer burn and preserves the taste, texture, and overall quality of the tindora.
Freezer burn occurs when air comes into contact with the frozen food, causing moisture to evaporate and resulting in dry, discolored patches on the surface. To prevent freezer burn, it is essential to remove as much air as possible from the packaging. Airtight freezer bags or containers create a sealed environment that minimizes air exposure, reducing the risk of freezer burn.
When using freezer bags, choose those specifically designed for freezing and ensure they are labeled as airtight. Place the flash-frozen tindora into the bag, leaving some space at the top. Press gently on the bag to release any excess air, and then seal it tightly. If using containers, make sure they have a tight-fitting lid that creates a secure seal.
Removing excess air from the packaging also helps to prevent the formation of ice crystals, which can negatively impact the texture and quality of the tindora. By minimizing air exposure, you maintain the optimal moisture content within the packaging, preserving the texture and taste of the tindora.
Step 8: Label and date the packages
After packaging and sealing the tindora in airtight freezer bags or containers, it is important to label each package with the date of freezing. By doing so, you can keep track of the storage time and ensure that you use the oldest tindora first when retrieving them from the freezer. This practice promotes food safety and helps maintain the quality of the frozen tindora.
Labeling the packages with the date of freezing serves as a reference point for the duration of storage. It allows you to know exactly how long the tindora have been in the freezer, helping you to prioritize their use based on the principle of “first in, first out” (FIFO). This means that you should use the oldest frozen tindora first to ensure that they are consumed before any potential loss in quality or nutrient degradation occurs.
By adhering to FIFO, you can minimize food waste and maximize the freshness and flavor of the tindora. Additionally, it helps you manage your freezer inventory effectively, preventing any packages from being forgotten or left unused for extended periods.
Labeling the packages can be done using a marker directly on the freezer bags or containers, or by using adhesive labels. Include the date of freezing in a clear and visible manner, making it easy to identify when the tindora were frozen.
Step 9: Store in the freezer
Once you have properly packaged and labeled the tindora, it’s time to store them in the freezer. Proper storage is crucial to maintain the quality, texture, and taste of the frozen tindora for an extended period. Follow these steps to ensure optimal freezer storage:
- Place the packaged tindora in the freezer: Find a suitable spot in your freezer where the tindora can be stored undisturbed. Ideally, choose a flat surface or shelf where the packages can lie in a single layer without being stacked or squeezed tightly together. This allows for better air circulation and helps to maintain the individuality of each tindora.
- Maximize space: Arrange the packages in a way that maximizes the available freezer space. By placing them in a flat position, you optimize the use of space and make it easier to locate and access the desired package when needed.
- Maintain a constant freezing temperature: Ensure that your freezer maintains a consistent temperature of 0°F (-18°C) or below. This temperature is necessary to keep the tindora properly frozen and maintain their quality over time.
- Frozen tindora storage duration: While the tindora can remain safe to eat indefinitely when stored at 0°F (-18°C), it is recommended to use them within a specific time frame to preserve their best quality. For optimal flavor and texture, it is advised to consume the frozen tindora within 8 to 12 months of freezing. Beyond this period, the quality may gradually decline, although the tindora will still be safe to eat.
Proper freezer storage helps to maintain the taste, texture, and nutrient content of the tindora. By storing them in a flat position, maximizing freezer space, and maintaining a consistent freezing temperature, you create the ideal conditions for long-term storage.
Remember to keep track of the storage time by referring to the date labels on the packages. This allows you to prioritize the use of the oldest tindora first, ensuring that they are consumed before any potential quality decline occurs.
Other related questions
How do I defrost tindora?
To defrost tindora, follow these steps:
- Remove from the freezer: Take the desired amount of frozen tindora from the freezer. It’s recommended to defrost only the portion you plan to use to avoid unnecessary thawing and refreezing.
- Thaw in the refrigerator: Place the frozen tindora in a bowl or airtight container and transfer it to the refrigerator. Allow them to thaw slowly and evenly in the refrigerator overnight or for approximately 6 to 8 hours. Thawing in the refrigerator ensures a controlled thawing process and helps maintain the quality of the tindora.
- Rinse if desired: After thawing, you can rinse the tindora under cool water to remove any excess ice crystals or moisture. This step is optional and can be skipped if you prefer to retain the natural moisture of the tindora.
- Pat dry: Gently pat the thawed tindora dry using a clean kitchen towel or paper towels. This step removes any remaining moisture and prepares them for cooking or further preparation.
- Use as desired: Once thawed and dried, the tindora are ready to be used in your preferred recipe. They can be sautéed, stir-fried, added to curries, or incorporated into any dish that calls for tindora.
It’s important to note that thawed tindora may have a slightly softer texture compared to fresh ones. However, their flavor and nutritional value should remain intact, allowing you to enjoy their unique taste and versatility in your dishes.
Avoid using methods such as defrosting in hot water or the microwave, as these methods can lead to uneven thawing and may affect the texture and quality of the tindora.
How do I thaw frozen tindora quickly?
For faster thawing, you can place the frozen tindora in a sealed plastic bag and submerge them in cold water. Change the water every 30 minutes until the tindora is fully thawed.
Can I refreeze tindora?
No, it is generally not recommended to refreeze tindora once they have been thawed. Thawing and refreezing can lead to a loss of quality, texture, and taste. It is best to thaw only the amount needed and use them immediately to ensure optimal freshness and flavor.
How do I know if the tindora has gone bad after being frozen?
After being frozen, you can assess the quality of tindora by examining their appearance, smell, and texture. If the tindora appears discolored, mushy, or has a strong off-putting odor, it may indicate spoilage. Additionally, if there are any signs of mold or freezer burn, it is best to discard them. Trust your senses and prioritize safety when determining if frozen tindora has gone bad.
Can I freeze tindora that has already been cooked?
While it’s possible to freeze cooked tindora, their texture may change upon thawing, resulting in a softer or mushier consistency. It’s best to freeze raw tindora for optimal results.
Can I freeze tindora with spices or seasonings?
It’s recommended to freeze tindora without any added spices or seasonings. Freezing can intensify the flavors, and some spices may lose their potency. It’s best to add spices or seasonings when cooking with the thawed tindora.
Can I freeze tindora that has been sliced or cut?
Yes, you can freeze sliced or cut tindora. However, keep in mind that smaller pieces may thaw faster than the whole tindora. Proper packaging and sealing are crucial to prevent freezer burn and maintain their quality.
Can I freeze tindora for making juice or smoothies?
While tindora is commonly used in cooking, freezing them for juice or smoothies is not recommended. The freezing process can affect their texture, making them less suitable for blending purposes.

